How to find & customize a single section with CSS in Squarespace 7.1
Even if you’ve been designing in Squarespace for a while now, working with Squarespace 7.1 can be a little confusing especially when you’re so familiar with its 7.0 version. All 7.1 templates are structured the same, the user interface works differently, and some features are not yet available.
If you’ve taken any of my courses here in Squarestylist, you’ll know that I make them compatible for both Squarespace 7.0 and 7.1 to keep your options open.
And that includes tools you can use to streamline your workflow.
For instance, I often recommend identifying the class or ID of a block, section, or collection page if you want to limit the effect of your CSS code to that specific part without affecting the rest of your site. Google Chrome’s Developer Tools could do all that and more with a simple Cmd/Ctrl + Shift + I. But let’s face it—the inspector panel looks a little too much to take in at times, and figuring it out can be too time-consuming.
I previously used the Squarespace Collection/Block Identifier extension, which was pretty useful. However, I found out soon enough that it doesn’t show the section ID in 7.1 for some reason. That’s when I started looking for a better alternative.

Using the Squarespace ID Finder
Luckily while I’ve been working on Mosaic, my new Squarespace 7.1 template, I discovered a really great tool that will make it easy for us to determine the section ID. It’s called the Squarespace ID Finder by Heather Tovey. And personally, it’s been an absolute game-changer for how I work with custom code.
Not only is it built to show us the selector that we need for our CSS code, but it’s also color-coded for our convenience. You’ll be seeing Block IDs in red, Section IDs in blue, and Collection IDs in yellow.
This is why I highly encourage you to download this extension in Google Chrome. It’s free, and it only takes a minute!
Applying the ID to your Custom CSS panel
1. Click on the icon next to your search toolbar
Upon installing this Chrome extension, you’d usually find it easily on the top-right portion of your browser. You might have to click on the Extensions settings (i.e. the “puzzle piece” icon) if it doesn’t immediately show up.
Make sure to have your Squarespace 7.1 site on-screen so you can see the IDs pop up right away.

2. Select the ID of the part you want to customize
Once you get to block, section, or collection where you want your CSS code to apply, all you have to do is click on its ID. The extension will immediately confirm that it’s been copied to your clipboard for you.
3. Nest your code snippet within the ID selector
Now what’s left for you to do is to open your Custom CSS panel, paste the Squarespace ID as is, then type in curly brackets. In a process called nesting, you’ll be typing in the customizations you want to designate for that section within those brackets. Here’s how that would look like when you want to, say, change the font color of a single `Heading 1` in your new webpage section:
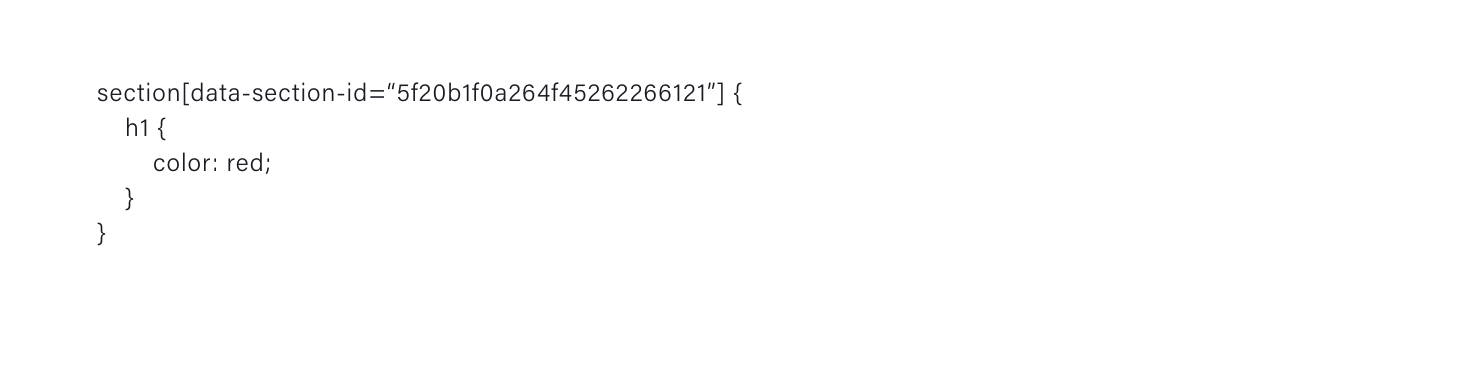
The Squarespace ID in this instance is `section[data-section-id=“5f20b1f0a264f45262266121”]` so be sure to replace the entire thing with your own ID if you want to apply this to the Squarespace 7.1 site that you’re working on. Please don’t forget the closing bracket at the bottom as well, or else the code won’t work properly. Want to see the Squarespace ID Finder in action? Watch me walk you through the process below, and you’ll even get a sneak peek of the Mosaic template. 😍